Table of Contents
Introduction
Similar to editing text, I feel like working with mails is a workflow worth optimizing. This is why I have been using mutt as my email client for several years now. And just like vim, mutt is a deep rabbit hole that one can easily spend years customizing to fit one's workflow perfectly. Following the Unix philosophy, I only use mutt for viewing mails. For mail processing and management I use other programs, that are a better fit for that job:
- mutt: MUA (mail user agent)
- msmtp: MTA (mail transfer agent)
- isync: MRA (mail retrieval agent)
- vim: For writing the mails
- notmuch: Mail indexer
This might seem overkill at first glance, but it gives you total control over your mail workflow. How all these tools interact with each other is better left for another blog post.
Address autocompletion
When I compose a new mail, I expect my mail client to autocomplete any contacts that I have already communicated with in the past.
Mutt offers support for autocompletion via aliases, but out of the box it doesn't do anything as you have to manually write all addresses that you want to autocomplete to a file first. Also the alias file format is a bit weird, as it requires you to provide a non-optional id (the alias name) for each mail address. Luckily mutt has an alternative autocompletion system via the query command, which allows us to integrate with external programs.
Since we are already using notmuch as a mail indexer, it is trivial to output all email addresses (remember what I said about the Unix philosophy and using the right tool for the right job?):
notmuch address --deduplicate=address --output=sender --output=recipients '*'
As to be expected from a mail indexer, notmuch is very fast with this and outputs all addresses in a matter of a few milliseconds, regardless of whether your inbox contains a few hundred or literally millions of messages. If we want to use these addresses in mutt, we have to translate them into a specific query format, so I came up with the following shell one-liner using jq:
notmuch address --deduplicate=address --output=sender --output=recipients --format=json '*' |
    jq -r '.[] | if .name == "" then "\(.address)\t\t" else "\(.name)\t<\(.address)>\t" end' > ~/.cache/mutt/aliases
The resulting file is stored in ~/.cache/mutt/aliases. Now to use this in mutt, we have to set a custom query command:
set query_command = "echo ; grep -i %s ~/.cache/mutt/aliases"
And that's it, mutt will now autocomplete all addresses that we have ever communicated with, no more manually adding contacts to an alias file! 🥳
Autocompletion is triggered with ^T by default, but personally I think the Tab key is a much saner choice:
bind editor <Tab> complete-query
I also recommend changing the query_format setting, as it starts truncating addresses way too early. The following setting allows you to see long mail addresses better (by default it cuts at 25 instead of 35 characters):
set query_format = "%4c %t %-35.35a %-25.25n %?e?(%e)?"
Show extra information
But wait, there's more! The query command was originally intended to get contacts from external services like an LDAP server and has the ability to show extra information for each entry in the autocompletion menu. Let's abuse this feature to show the subject of the most recent email sent or received for each address!
Implementing this is a little bit more involved as we can no longer just use notmuch for this and have to iterate through all mails. I have written this shell script to do just that and run it with a systemd timer after each mail sync to generate the aliases with subject information. It will cache previous runs so that only new mail will be processed on subsequent runs. Still, if you have millions of mails, for the first run you might prefer the simpler variant without subject information from above.
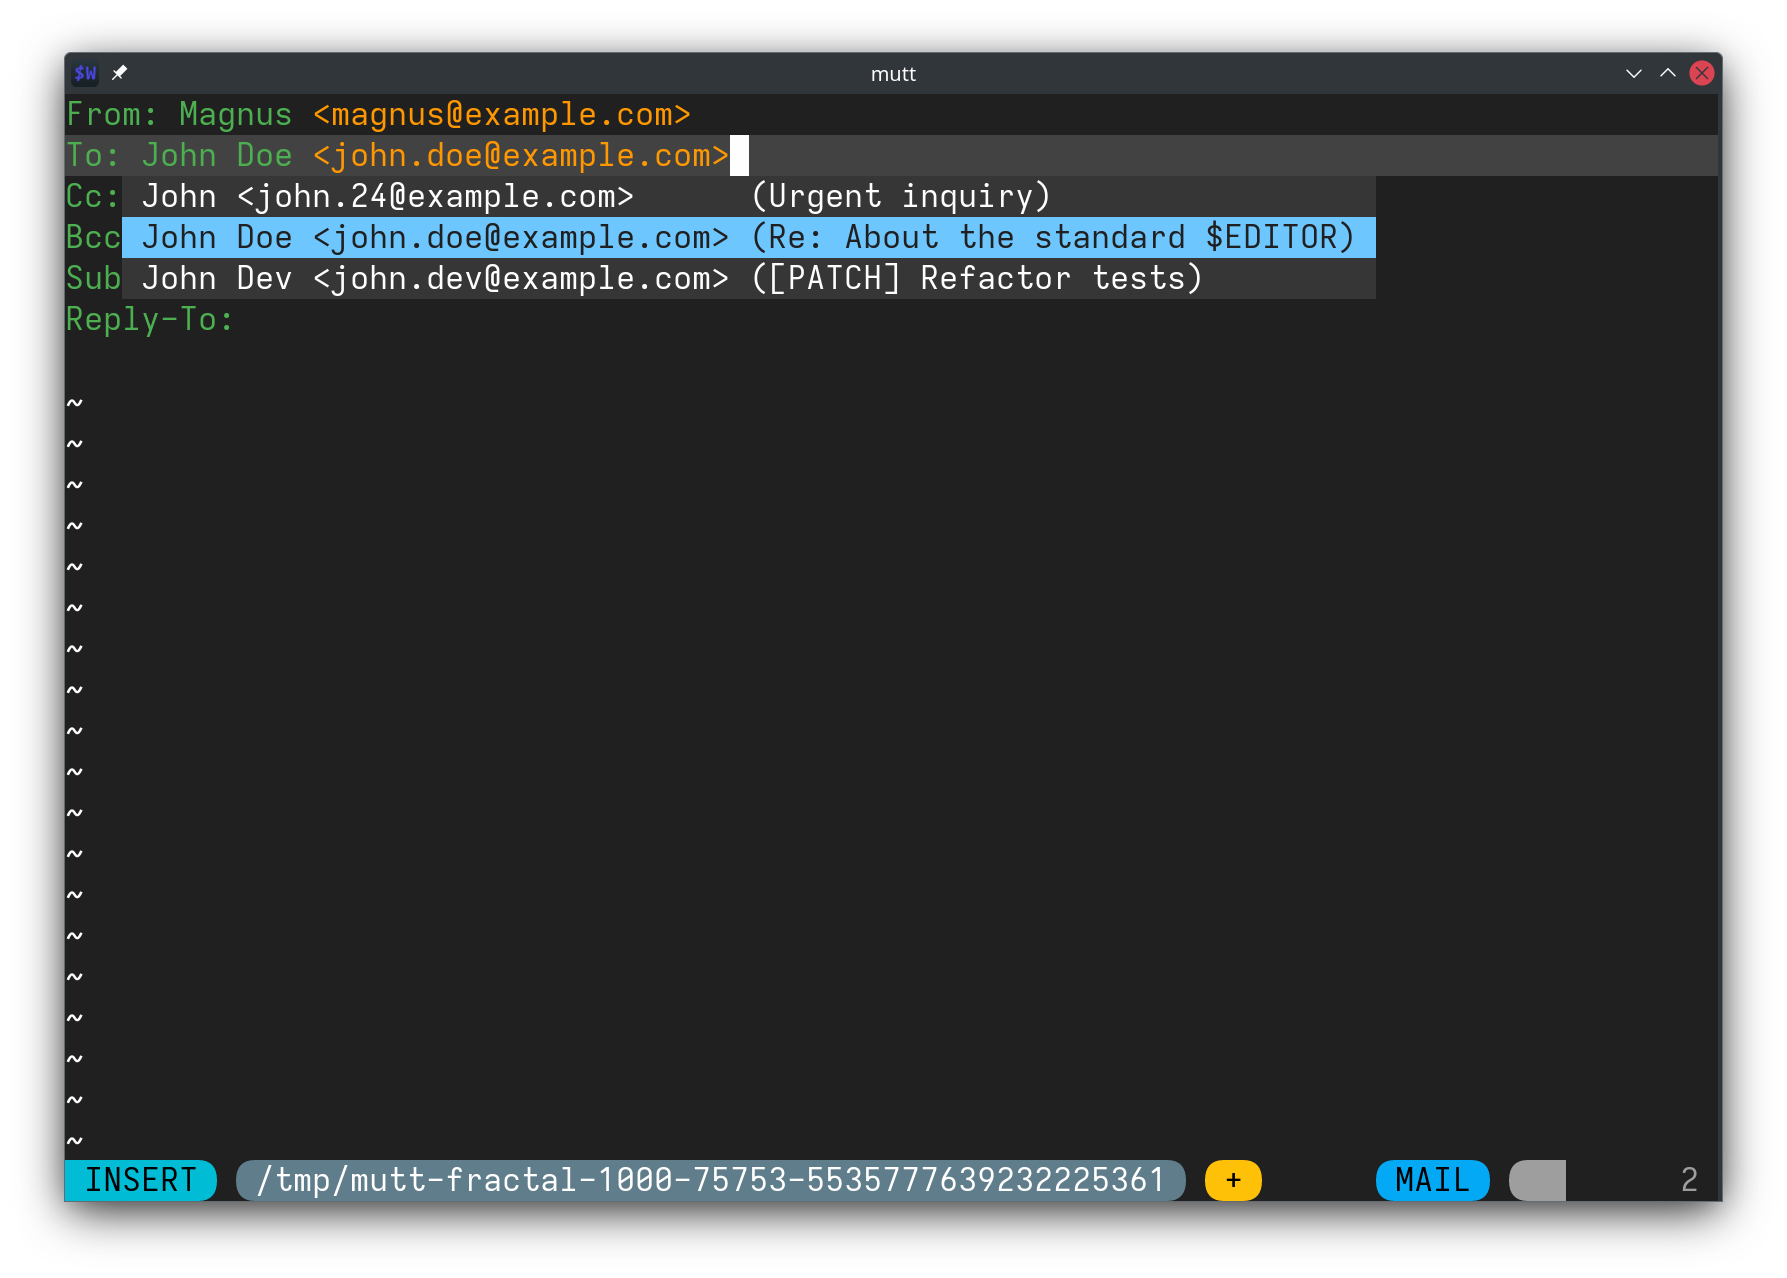
Now with this extra info generated, we can see the most recent email subject next to each email address. For example, if one were to autocomplete the query "John", mutt would show the following options with the subject in the last column:
1 john.24@example.com   John         (Urgent inquiry)
2 john.doe@example.com  John Doe     (Re: About the standard $EDITOR)
3 john.dev@example.com  John Dev     ([PATCH] Refactor tests)
For people that have multiple email addresses, this really helps at distinguishing them. This is only a short glimpse at what is possible with mutt's customizability.
Autocompletion from vim
Some people like to edit the email headers such as To:, CC: and Subject: directly in vim. In order to stop mutt from asking for this information, the following config snippet will pass the headers to the vim buffer instead:
set edit_headers
set autoedit
In vim we can then use this custom omnifunc for the mail filetype to replicate the autocompletion from above:
func CompleteAddr(findstart, base)
	if a:findstart
		if getline(line('.')) =~ '^\(To\|B\?CC\): '
			return searchpos(' ', 'bnW', line('.'))[1]
		endif
		return -3
	endif
	return readfile(expand('~/.cache/mutt/aliases'))
		\ ->filter({_, v -> v =~ a:base})
		\ ->map({_, v -> v->split('\t')})
		\ ->map({_, v -> #{
		    \ word: v[:1]->reverse()->join()->trim(),
		    \ menu: printf('(%s)', v[2:]->join())
		\ }})
endfunc

au FileType mail setlocal omnifunc=CompleteAddr
Here we use a giant filter-map chain to transform the mutt alias file into the final vim autocompletion list. By providing the menu field, vim can show the subject line after the autocompletion.
Alternatively one could use the info field to show the subject in a popup window next to the autocompletion, but this would lose the advantage of being able to see all subjects at once.